> ## Documentation Index
> Fetch the complete documentation index at: https://help.oncontinuum.com/llms.txt
> Use this file to discover all available pages before exploring further.
# Create and edit your Pages
> Create a Page from a meeting, document, template, or scratch prompt, then shape it with AI and your firm’s branding.
This is the main workflow for building a Page. Start with the source that gives Continuum the best context, review the draft, use the AI chat to make changes, check your Brand, and publish only when the Page is ready for your client.
Every Page needs at least one client before it can be generated.
## Choose the best starting point
There are five common ways to create a Page.
**From a meeting:** Best when the Page is a follow-up to a real conversation. Continuum can use the transcript, summary, notes, participants, action items, and attachments as context.
**From scratch:** Best when there is no meeting behind it, or when you want to send a proactive deliverable.
**From a document:** Best when a plan, statement, proposal, or illustration is the main source of the Page.
**From a template:** Best when you want to reuse a consistent structure for a recurring deliverable.
**By duplicating an existing Page:** Best when you already have a Page structure you like and want to adapt it.
If this is your first time, start with [Create your first Page](/pages/your-first-page) and send a rehearsal Page to yourself before sending one to a client.
See step-by-step here:
This is the recommended path for most first Pages.
Go to **Meetings** and open a meeting that has already been captured and generated.
Click **Create Page** from the meeting view.
In the **Client** field, select the client or prospect this Page is for. Meeting participants appear first, followed by your other contacts.
If your workspace has Page templates, choose one from the **Template** field. You can also leave the template blank and let Continuum structure the Page from the meeting.
Click **Generate Page**. Continuum creates the Page and opens it in the editor with the AI panel ready to continue refining it.
### What a meeting can pre-populate
The exact draft depends on the meeting, the selected client, and any template you choose. A Page created from a meeting can include:
* **Header** — Your firm logo, your name, your photo, and a schedule-meeting action for the client
* **Personal message** — A note drafted from the conversation that you can refine before publishing
* **Meeting summary** — The key points discussed, written for the client
* **Next steps** — Action items with checkboxes, descriptions, due dates, and links where relevant
* **Attachments** — Files connected to the meeting or added while refining the Page
* **Schedule Meeting** — A booking section so the client can schedule a follow-up
Create a Page from scratch when there is no meeting behind it, or when you want to send a proactive deliverable.
Use this for onboarding packages, quarterly updates, proposals, planning ideas, document packages, or any client-facing explanation you would otherwise write as a long email.
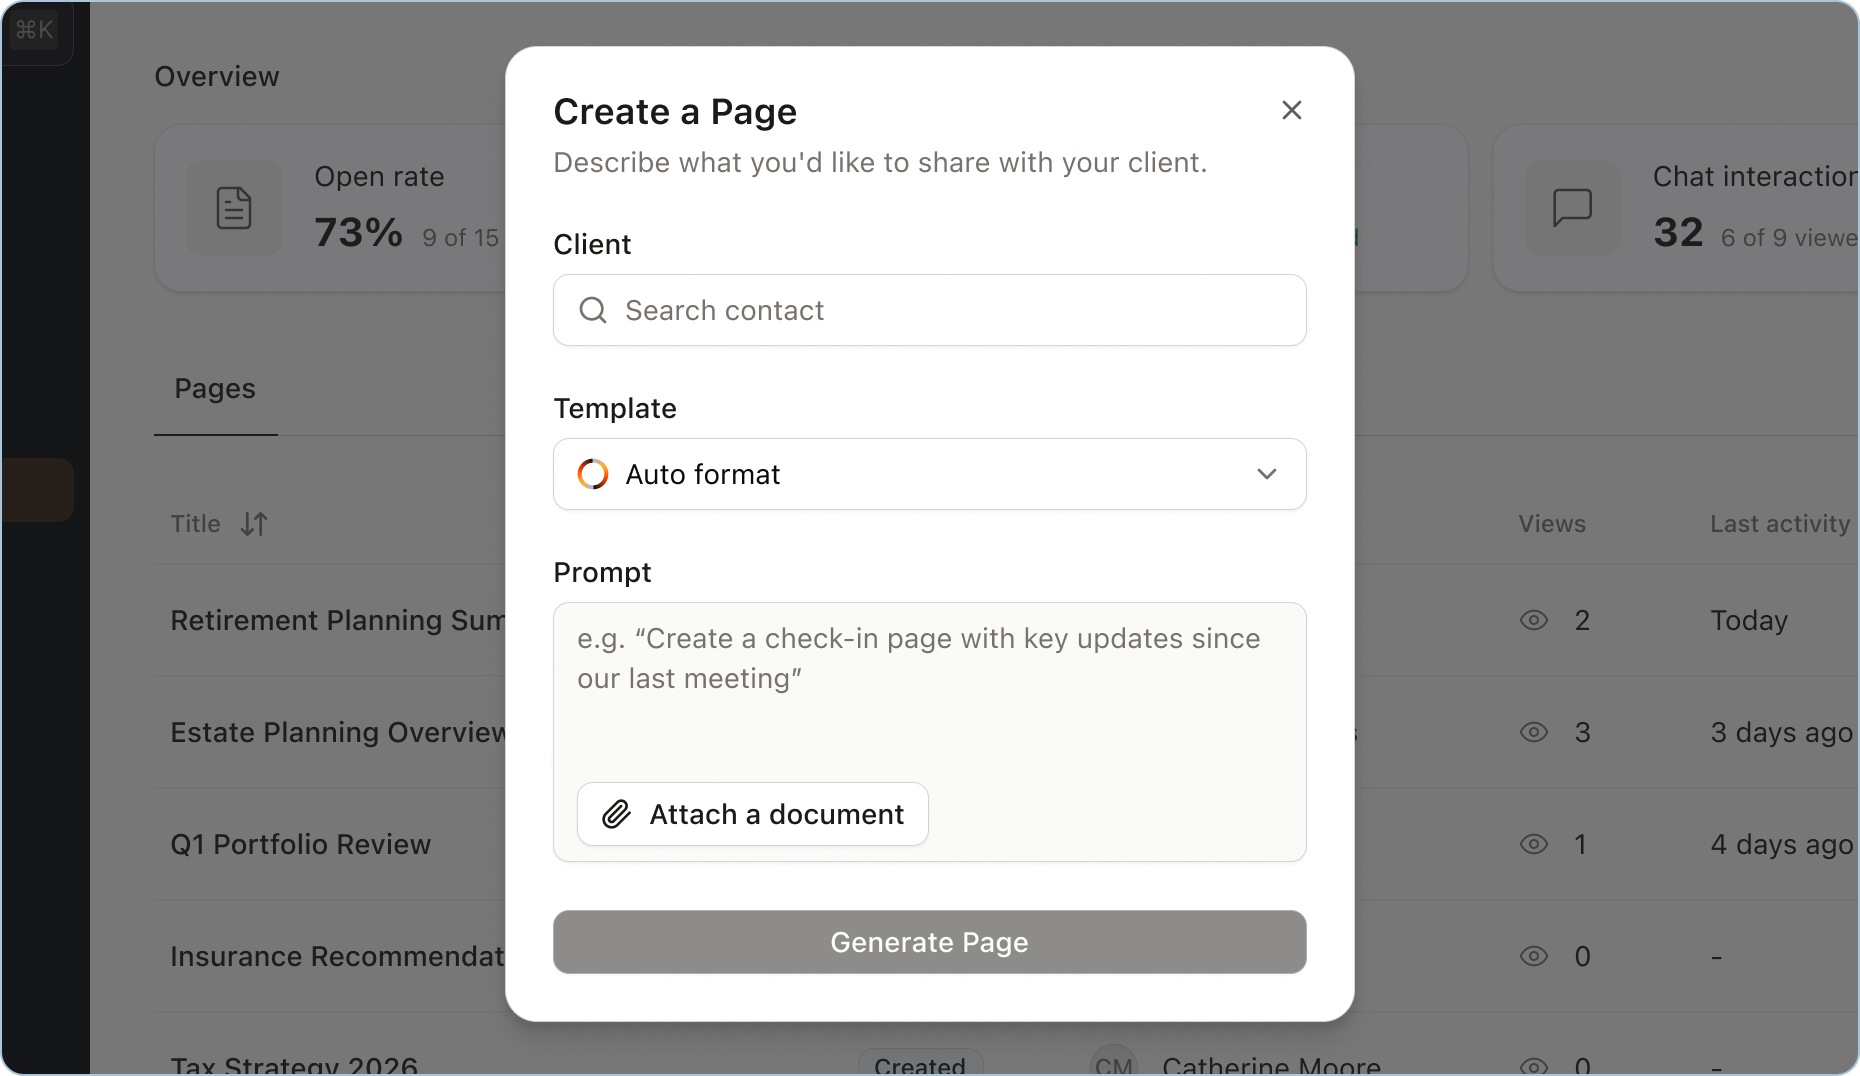
Go to **Pages** and click **New Page**.
Select at least one client in the **Client** field.
Use **Meeting (optional)** if the Page should draw context from a past meeting. Leave it blank if the Page does not relate to a meeting.
Select a Page template from **Template**, or leave it blank to let Continuum decide the structure.
In **Prompt**, tell Continuum what to create. You can also click **Attach document** to include files as context.
> For example: "Put together a welcome page for a new client with the documents they need to review and the next steps for account setup."
Use this path when the document is the main source of the Page. For example, you might upload a financial plan, statement, proposal, insurance illustration, or onboarding package and ask Continuum to explain it clearly for your client.
Go to **Pages** and click **New Page**.
Select at least one client in the **Client** field.
In the **Prompt** area, click **Attach document** and upload the file. You can also drag and drop the file into the prompt area.
Be explicit about whether the document should become part of the Page, stay attached for download, or both.
> For example: "Pull the key projections from this financial plan into the Page as a summary and chart, and also attach the original PDF for download."
Click **Generate Page**, then review the output before publishing. Check any numbers, assumptions, names, and dates against the original document.
Files must be under 20 MB. If a file is too large, reduce the file size or split it into smaller documents before uploading.
Use a Page template when you want a consistent structure for a recurring deliverable, such as a quarterly review, discovery follow-up, onboarding package, or plan review.
Go to **Pages** and click **New Page**.
Select at least one client in the **Client** field.
Use the **Template** field to select the Page template you want.
Link a meeting, attach documents, or write a short prompt explaining what should be included.
Click **Generate Page**. Continuum uses the template structure with the client, meeting, document, and prompt context you provided.
Page templates are different from meeting templates. A meeting template shapes your meeting notes and summary. A Page template shapes the client-facing deliverable. Learn more in [Page templates](/pages/templates).
Duplicate a Page when you already have a structure you like and want to reuse it for another client or another version of the same deliverable.
Go to **Pages** and find the Page you want to reuse.
Click the **three-dot menu** on the Page.
Continuum creates a new Page copy and opens it in the editor.
Review the copied Page carefully. Change the client-specific message, numbers, documents, dates, and next steps before publishing.
A duplicated Page can save time, but it can also carry over details from the original. Always review client names, personal details, account information, attachments, and next steps before publishing.
## Review the draft before editing deeply
Before you start making a lot of changes, scan the Page once from top to bottom.
Check:
* **Client access** — The right client or clients are listed
* **Personal message** — The opening sounds like you
* **Facts and numbers** — Names, dates, assumptions, and figures are correct
* **Next steps** — Action items are clear and assigned to the right person
* **Attachments** — Only the intended documents are attached
* **Branding** — The Page reflects your firm’s current logo and colours
Nothing your client sees changes until you publish. If you change a Page after publishing, Continuum will show that the Page has unpublished changes until you update the published version.
## Edit with the AI chat
Pages are edited through the AI chat. Tell Continuum AI what you want to change in plain English, review the result, and keep refining until the Page is ready.
Use the AI chat for both small fixes and larger changes. For example, you can ask it to correct a name, change a date, remove a sentence, add a section, restructure the Page, summarise a document, or update a chart.
Page content is edited through the AI chat, not by clicking into the Page like a document. If you want something changed, describe the change you want.
#### Pro tip
To make your Pages feel more personal, add your profile photo in **Settings > Profile**. Continuum uses your profile name and photo in the footer of the Pages you create, so clients can clearly see who the Page is coming from.
## Prompts that work
Good prompts are specific, but they do not need to be formal. Write the way you would explain the change to an assistant on your team.
### Change the tone
* “Make the tone more formal”
* “Rewrite the personal message so it sounds more like me and less like a report”
* “Shorten the summary to three paragraphs”
* “Make the opening warmer and more conversational”
* “Make this easier for someone who has never reviewed an insurance illustration before”
### Add something
* “Add a section about the RESP contribution strategy we discussed”
* “Add a branded cover with a one-line summary”
* “Add a timeline for what happens next”
* “Add a short section explaining why we are recommending the conservative scenario”
* “Add a reminder that the signed forms are due by Friday”
### Restructure the Page
* “Turn next steps into a checklist with due dates”
* “Move the action items above the summary”
* “Split this into two sections, one for each account”
* “Group the recommendations into short-term and long-term actions”
* “Put the documents in their own section at the end”
### Work with data
* “Update the chart to show the last five years instead of three”
* “Pull the key projections out of this PDF and add them to the Page”
* “Show the two insurance quotes side by side in a table”
* “Create a chart comparing current contributions with the proposed contribution amount”
* “Summarise the fees in this document and call out the main difference”
### Personalise the Page
* “Mention that I enjoyed meeting their daughter”
* “Reference the fact that they’re retiring in 2029”
* “Add a sentence that connects this plan to their goal of spending winters in Arizona”
* “Make the next steps feel less formal and more collaborative”
### Draft the covering email
* “Draft a follow-up message to send with this page”
* “Write a short email that introduces this Page and asks them to review the next steps”
* “Draft a warmer version of the email for a long-time client”
If the Page was created from a meeting, Continuum already has the meeting transcript as context. You can ask it to bring in something that was discussed but did not make it into the first draft.
## Going further with interactive content
A Page is interactive content, so Edit with AI can do more than rewrite text.
Try prompts like:
* “Add a slider so they can see what happens if they contribute \$200 more a month”
* “Add a toggle between the conservative and the growth scenario”
* “Turn the fee comparison into a chart”
* “Create a simple timeline from today to their target retirement date”
* “Add a checklist they can work through before our next meeting”
Use these when the interaction helps your client understand the recommendation. A simple Page is often better than an impressive one if it makes the next step clearer.
## When the AI gets something wrong
Nothing your client sees changes until you publish. You can review the Page, ask the AI chat for changes, and keep refining before it goes live.
**If the wording is off:** Ask for the result you want. For example, “Make this shorter and more direct” or “Rewrite this as a note from me, not as a report.”
**If the structure is off:** Describe the final shape. For example, “Use three sections: What we reviewed, What we recommend, and What happens next.”
**If a fact is wrong:** Correct it directly. For example, “The retirement date is 2029, not 2030. Update the Page anywhere this appears.”
**If the Page fails to render:** Use **Ask AI to fix**. Continuum sends the render error back to the assistant so it can repair the Page.
**If you already published the Page:** Your edits become unpublished changes. Review them, then click **Update page** when you are ready for the published version to reflect the edits.
Always review facts, numbers, assumptions, client names, and document details before publishing. Edit with AI can save time, but you remain responsible for the final Page you send.
## Set up your Brand
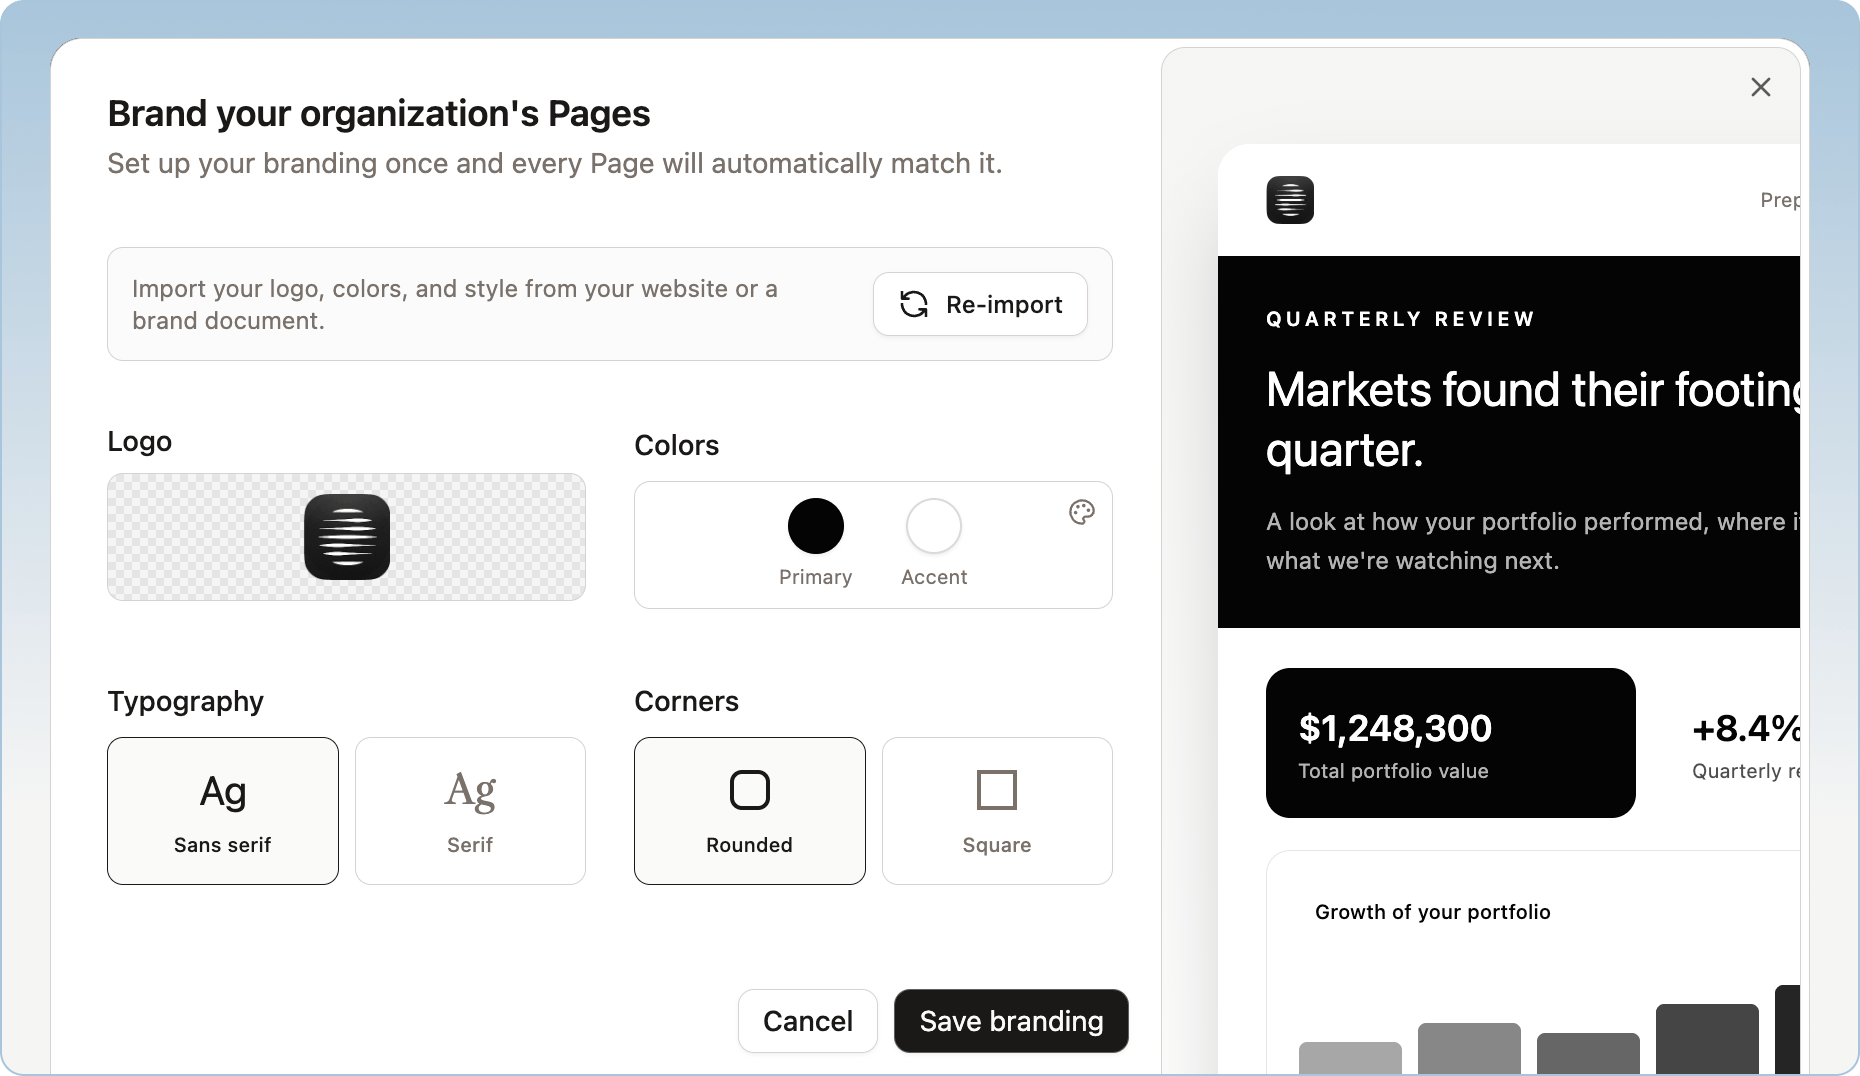
Pages are designed to feel like your client is interacting with your firm, not with a generic software tool. Once your Brand settings are configured, Continuum applies them to future Pages created across your organization, helping every client experience feel consistent with your firm.
Your brand can include your company name, logo, primary colour, accent colour, font style, and corner style.
From a Page, open the **Brand** panel. If this is your first time, Continuum will guide you through setup.
Enter your firm’s website or upload a brand document. Continuum extracts brand options from the source you provide.
Review the logo, colours, font style, and corner style. Adjust anything that does not match your firm.
Click **Save**. Your Brand is saved for future Pages.
Brand settings are organization-wide. Changes you make here will apply to all future Pages created by you and anyone on your team.
## What you can adjust in Brand settings
**Logo:** Choose an extracted logo, upload your own, or remove the logo if needed.
**Primary colour:** The main colour used across the Page.
**Accent colour:** The supporting colour used for highlights and secondary elements.
**Font style:** Choose **Sans serif** or **Serif**.
**Corner style:** Choose **Rounded** or **Square**.
The company name shown on Pages comes from your organization settings. Only admins can update it from **Settings > Organization**.
## Updating your Brand after Pages are published
If you change your Brand after Pages have already been published, existing Pages may show unpublished changes. That means the draft has newer brand settings than the version your client can currently open.
Open each affected Page, review the update, and click **Update page** when you want the published version to use the new Brand.
Updating Brand settings can affect the look of existing Pages, but your client will not see those changes on a published Page until you update the published version.
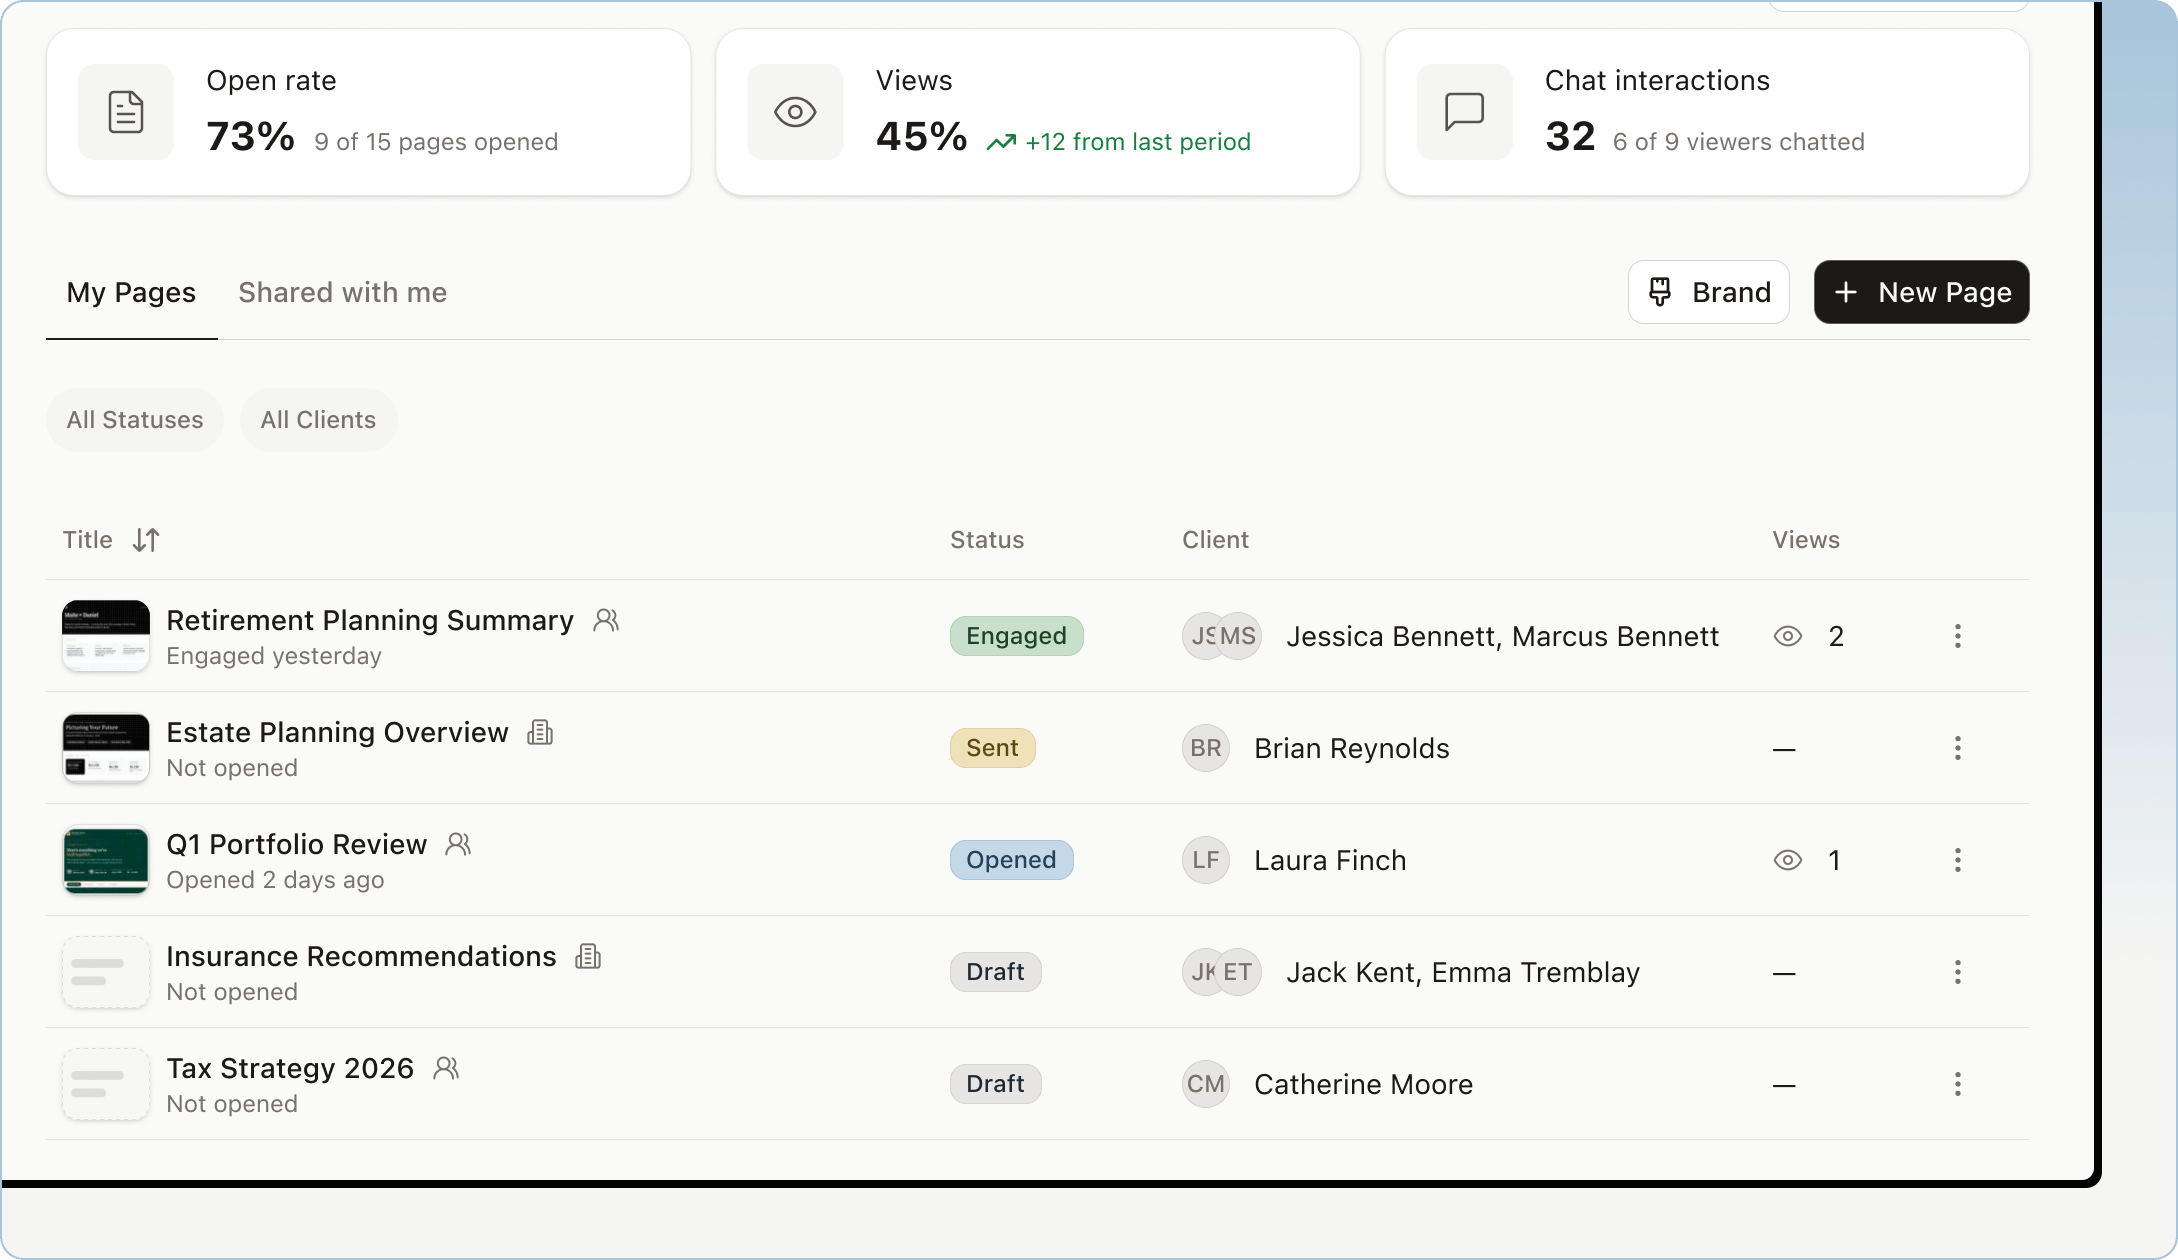
## Page statuses
The Pages list shows where each Page is in the client engagement flow.
Draft — The Page has been created but not published yet. Your client cannot open the client link until the Page is published.
Sent — The Page has been published and is ready to share. This means the client link can work for the clients who have access.
Opened — At least one allowed client has opened the Page.
Engaged — A client has interacted more deeply with the Page, such as asking the assistant a question.
Use these statuses to understand what needs attention. A **Draft** may need review before publishing. A **Sent** Page that has not become **Opened** may need a follow-up. An **Engaged** Page is a signal that your client is spending time with the content.
 ## Review the draft before editing deeply
Before you start making a lot of changes, scan the Page once from top to bottom.
Check:
* **Client access** — The right client or clients are listed
* **Personal message** — The opening sounds like you
* **Facts and numbers** — Names, dates, assumptions, and figures are correct
* **Next steps** — Action items are clear and assigned to the right person
* **Attachments** — Only the intended documents are attached
* **Branding** — The Page reflects your firm’s current logo and colours
Nothing your client sees changes until you publish. If you change a Page after publishing, Continuum will show that the Page has unpublished changes until you update the published version.
## Edit with the AI chat
Pages are edited through the AI chat. Tell Continuum AI what you want to change in plain English, review the result, and keep refining until the Page is ready.
Use the AI chat for both small fixes and larger changes. For example, you can ask it to correct a name, change a date, remove a sentence, add a section, restructure the Page, summarise a document, or update a chart.
## Review the draft before editing deeply
Before you start making a lot of changes, scan the Page once from top to bottom.
Check:
* **Client access** — The right client or clients are listed
* **Personal message** — The opening sounds like you
* **Facts and numbers** — Names, dates, assumptions, and figures are correct
* **Next steps** — Action items are clear and assigned to the right person
* **Attachments** — Only the intended documents are attached
* **Branding** — The Page reflects your firm’s current logo and colours
Nothing your client sees changes until you publish. If you change a Page after publishing, Continuum will show that the Page has unpublished changes until you update the published version.
## Edit with the AI chat
Pages are edited through the AI chat. Tell Continuum AI what you want to change in plain English, review the result, and keep refining until the Page is ready.
Use the AI chat for both small fixes and larger changes. For example, you can ask it to correct a name, change a date, remove a sentence, add a section, restructure the Page, summarise a document, or update a chart.
 ## Updating your Brand after Pages are published
If you change your Brand after Pages have already been published, existing Pages may show unpublished changes. That means the draft has newer brand settings than the version your client can currently open.
Open each affected Page, review the update, and click **Update page** when you want the published version to use the new Brand.
## Updating your Brand after Pages are published
If you change your Brand after Pages have already been published, existing Pages may show unpublished changes. That means the draft has newer brand settings than the version your client can currently open.
Open each affected Page, review the update, and click **Update page** when you want the published version to use the new Brand.